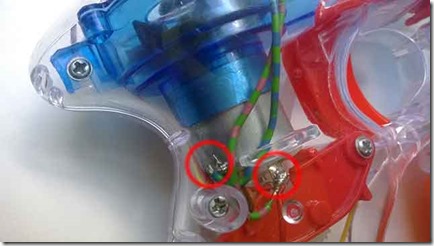
I wanted to demonstrate the usage of texting (SMS) for IoT (Internet of Things) and M2M (Machine to Machine communication). Therefore I disassembled a cheap bubble gun (usually less than 5 euros).
In the next step I bypassed the batteries and the trigger with soldering two cables directly to the gun’s electronic circuit. That’s the fiddly part.
The relay on the left acts like a switch for the toy, on the right are the cables to the toy’s electric circuit.
The rest is just using an Arduino with a GSM shield, connecting it to a relay and plugging in the cables from the bubble gun.
Still one issue: The mechanism needs initial a mechanical created film for the bubbles. This would be possible with little effort, but the costs for the extra parts would exceed the gun’s price. Therefore I skipped this and did it manually. A different mechanic as used by the Gazillion Bubble Machine might solve this. By the way, the liquid seems to be very special, because the gun does not work with the standard bubble liquid from my kids.
Controlling this via phone is only one option. You also can use an API with any of your applications like Global SMS API or combine it with voice via Telekom Tropo.
But one tricky thing is still missing: The code for receiving the message. In this case the Arduino frequently checks only for patterns in all received messages.
1 2 3 4 5 6 7 8 9 10 11 12 13 14 15 16 17 18 19 20 21 22 23 24 25 26 27 | void loop() { checkForInboundMessages(); } void checkForInboundMessages() { char inchar; // Will hold incoming character from the Serial Port String pattern = "+CMT"; String result; while(mySerial.available()!=0) { inchar = gsm.read(); result = result + inchar; } result.toUpperCase(); if (result.indexOf(pattern)>-1) { gsm.print("AT+CMGD=1,0\r"); if (result.indexOf("ON")>-1) { digitalWrite(RELAY, HIGH); } else if (result.indexOf("OFF")>-1) { digitalWrite(RELAY, LOW); } } } |
Once you have built something like this, you are basically able to control every toy with an on-off switch – and not only toys. You only need to bypass the switch with a relay connected to a computer (e.g. Arduino or Raspberry Pi). I am looking forward to your ideas…

